Windows 10/11 Updates and Maintenance
For keeping Windows a little longer.
Given the myriad of issues that can arise from Windows Updates there’s a bit of a process I follow to give it the best chance of success.
Free Space
First thing is having enough free space. Microsoft’s support page suggests at least 10GB but feature updates in the past have needed more. There’s no hard line on this but my rule of thumb is at least 20GB free.
Installation
When installing updates try to limit other activities; specifically don’t install or update other applications as well. While you can technically install/uninstall applications while updates are installing I would try to avoid it. The idea is prevent many changes at once: was it the application update or Windows update that broke it?
Post-Install
Reboot
If the update didn’t require a reboot, do it anyways.
SFC
After rebooting run the System File Checker tool and remediate as needed. From elevated prompt:
1
sfc /scannow
Ideally this will scan and find everything healthy. If Windows finds violations and successfully repairs it will prompt for a reboot. Run SFC again after the reboot to verify system was repaired.
If Windows finds violations and cannot repair, then repairing the system with DISM tool would be the next step:
1
DISM /Online /Cleanup-image /Restorehealth
If successful reboot and try SFC again. Otherwise a reinstall of Windows will probably be needed.
Disk Cleanup
Windows keeps old update installers and other data that after the system is confirmed health isn’t needed.
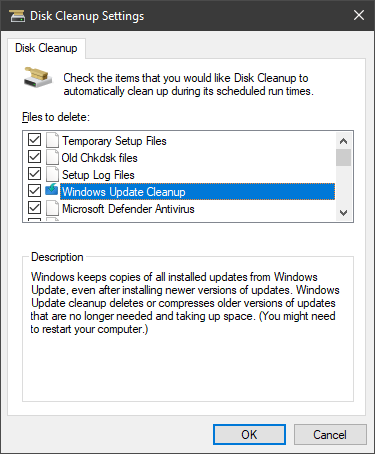
Set the Disk Cleanup Settings (only needed once, settings are saved). From elevated prompt:
1
cleanmgr /sageset:1
Check all the boxes and click OK.
Then run Disk Cleanup using those settings. From elevated prompt:
1
cleanmgr /sagerun:1
Sometimes the progress for cleanmgr freezes. Hover over or move the cleanmgr window to unfreeze.
Optional: Disk Optimization
This part is optional but I like to run a TRIM and slab consolidation. From elevated PowerShell:
1
2
3
Get-Volume | `
    Where {$_.DriveLetter -and $_.DriveType -eq 'Fixed'} | `
    %{Optimize-Volume -DriveLetter $_.DriveLetter -ReTrim -SlabConsolidate}
Automating
Doing all this manually can be annoying so why not script it all. To use this script just make sure you have configured the Disk Cleanup settings.
1
2
3
4
5
6
7
8
9
10
11
12
13
14
15
16
17
18
19
20
21
22
# Format command output
[Console]::OutputEncoding = [System.Text.Encoding]::Unicode

"System File Check running..."
$out = & sfc /scannow | Out-String
if($out -notmatch 'did not find any integrity violations') {
	$out
	Write-Error "Possible integrity violations, check output and reboot!"
	Read-Host "Press enter to continue"
	exit 1
}

"Disk Cleanup running..."
& cleanmgr /sagerun:1
Start-Sleep -Seconds 10
while(Get-Process "cleanmgr" -ErrorAction SilentlyContinue) { Start-Sleep -Seconds 1 }

"Optimizing Data..."
Get-Volume | Where {$_.DriveLetter -and $_.DriveType -eq 'Fixed'} | `
	%{Optimize-Volume -InputObject $vol -ReTrim -SlabConsolidate}

"Done!"
